Everything but the Turkey
9/21/2024 | 27m 55sVideo has Closed Captions
Green Bean Casserole, Make-Ahead Mashed Potatoes, Fireside and New Englander Cocktails
Keith Dresser makes Julia Collin Davison Green Bean Casserole. Equipment expert Adam Ried shares his must-have Thanksgiving tools. Elle Simone Scott makes host Bridget Lancaster Make-Ahead Mashed Potatoes. Julia and Bridget make Fireside and New Englander Cocktails.
America's Test Kitchen is presented by your local public television station.
Distributed nationally by American Public Television
Everything but the Turkey
9/21/2024 | 27m 55sVideo has Closed Captions
Keith Dresser makes Julia Collin Davison Green Bean Casserole. Equipment expert Adam Ried shares his must-have Thanksgiving tools. Elle Simone Scott makes host Bridget Lancaster Make-Ahead Mashed Potatoes. Julia and Bridget make Fireside and New Englander Cocktails.
How to Watch America's Test Kitchen
America's Test Kitchen is available to stream on pbs.org and the free PBS App, available on iPhone, Apple TV, Android TV, Android smartphones, Amazon Fire TV, Amazon Fire Tablet, Roku, Samsung Smart TV, and Vizio.
Providing Support for PBS.org
Learn Moreabout PBS online sponsorship♪♪ ♪♪ ♪♪ ♪♪ -Today on "America's Test Kitchen"... we're making everything but the turkey.
Keith and Julia cook the ultimate green bean casserole.
Adam reveals his must-have Thanksgiving kitchen tools.
Elle cooks Bridget make-ahead mashed potatoes, and Bridget and Julia make Fireside and New Englander cocktails.
It's all coming up right here on "America's Test Kitchen."
♪♪ "America's Test Kitchen" is brought to you by the following... -Plugrà European-style butter was created for all chefs, cooks, and bakers.
Slow-churned with 82% butterfat for a smooth texture and more pliability for flaky crusts.
Plugrà -- from professional kitchens to your home.
-On an American Cruise Lines journey along the legendary Mississippi River, travelers explore Civil War battlefields and historic riverside towns.
Aboard our fleet of American riverboats, you can experience the local culture and cuisine and discover the music and history of the Mighty Mississippi.
American Cruise Lines, proud sponsor of "America's Test Kitchen."
-The Breville Smart Oven Air Fryer Pro has over 13 functions.
Super Convection technology puts air-frying, dehydrating, and proofing at your fingertips, with space to feed the whole family and compact enough to sit on your countertop.
Results made simple.
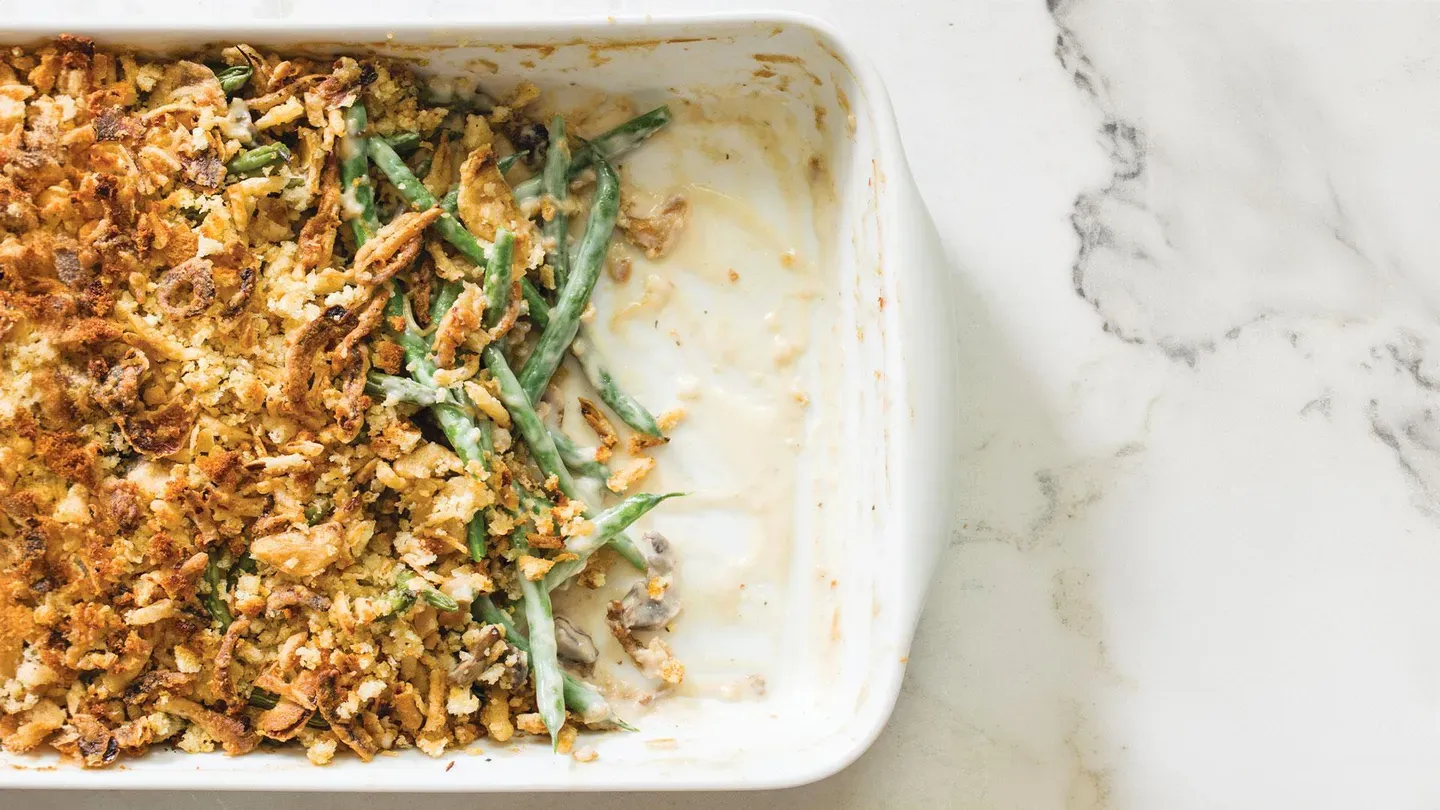
♪♪ -The recipe for green bean casserole was first developed back in 1955 by the Campbell Soup Company as a way to promote their cream of mushroom soup, and it has since become a standard on holiday tables all across America.
And today, Keith's gonna break the recipe down and show us how to make it from scratch using fresh ingredients.
-Yeah, there's nothing wrong with that casserole.
It's actually quite tasty.
-Mm-hmm.
-But I'm gonna take each component.
We're gonna look at it and make sure it has a fresh, homemade flavor.
-I'm in.
-We're gonna start with our mushroom sauce... -Okay.
-...that's gonna coat the green beans.
So I'm gonna start with 1 pound of white mushrooms.
We're actually gonna break these into pieces.
We're not gonna slice them.
We like chunks.
So I just have a mushroom right here.
And simple prep is just take a towel, wipe off any dirt on the outside of it, and then I just take the very bottom of the stem off, like that.
And now comes the fun part.
You can put it down and you can smash it.
-[ Laughing ] What?
-Yeah.
-I've actually never seen anyone do that.
-I know.
That's -- The only time that I've done this is for this dish, is that you can just whack it once and then break it into about 1/2-inch pieces.
-Are you getting some aggression out?
-Yes, yes.
-[ Laughs ] -Okay.
The mushrooms are in 1/2-inch pieces.
And we have 3 tablespoons of butter in our Dutch oven... -Mmm.
-...that's melting over medium-high heat.
So I'll add our mushrooms.
And I also have three cloves of garlic that we'll add.
3/4 teaspoon of table salt.
1/8 teaspoon of pepper.
Just want to make sure this is all stirred together and incorporated.
So six minutes, we'll let these cook.
-All right.
-It's been six minutes.
And you can see how much those mushrooms have cooked down.
So now we need to thicken this.
So I have 3 tablespoons of all-purpose flour.
I'm just gonna sprinkle that over the mushrooms.
Make sure it's also well-distributed on those mushrooms.
You don't want any pockets of flour that won't get incorporated into the liquid later.
So now for our liquid component.
I'm going to start with 1 1/2 cups of chicken broth.
I want to make sure that I get that flour incorporated slowly.
You can also make sure that you stir into the corner, and you get up any little brown bits off the bottom of that pot.
Then you can add a little bit more at a time once you get some of that broth in there.
Okay.
Our stock is bubbling there.
And now we can add our 1 1/2 cups of heavy cream.
So I'm just gonna stir this in to incorporate it, again getting into the corners, make sure we have any flour incorporated.
We're gonna cook this over medium heat for about 12 minutes.
And what we're looking for is to reduce down to 3 1/2 cups.
At that point, it will be nice, rich, and velvety.
It's gonna be perfect.
Now for the green beans.
Traditionally, this casserole used frozen green beans, but we really want to control the cook on the green beans.
So we're gonna blanch our own, make sure it's perfectly cooked at the end.
-I like it.
-So I have 2 pounds of green beans here.
Just a really quick, simple prep.
You're gonna take off the stem end.
You can either snap it, or what I like to do is, I like to grab four or five beans at the same time... -Line them up like little soldiers?
-...kind of line them up like soldiers, cut it off like that.
And also while you're holding the knife and the green beans, you could just kind of scooch back and we're just gonna cut these right in half crosswise.
Okay.
So that is our 2 pounds of green beans that we've cut crosswise.
Now it's time to blanch them.
So we'll come down here and I have 4 quarts of water that we've brought up to a boil.
I'm gonna add 2 tablespoons of table salt.
Now, these are gonna cook for six minutes.
And we're looking for a crisp, tender texture.
-Mmm.
-It's been six minutes.
And I just want to check the progress of these green beans carefully.
Mmm.
-Good?
-They're perfect right now.
And I'm just gonna transfer these over to an ice bath.
We want to arrest the cooking right now.
We don't want these to hang out and continue to cook and become kind olive-drab and mushy.
I'm now gonna transfer these over to a rimmed baking sheet that's been lined with paper towels.
So, and the reason why we want these dry... -Mm-hmm.
-...is, that sauce is gonna be nicely thickened.
And if we add more water to it, it's gonna get watery.
-Right.
-And you don't want that.
Okay.
So the green beans are out on our rimmed baking sheet with paper towels.
Those are gonna hang out and dry while we look at our sauce.
Now, I measured this earlier and we reduced it down to 3 1/2 cups.
-Mmm.
-And you can see that it's rich, it's velvety.
Our sauce is perfect and ready to go.
-Mm-hmm.
-And now we can get to my favorite part, which is the topping.
-Ha ha!
-Now, with this topping, we couldn't really find an improvement on the fried onions that are so classic to this dish.
So we're gonna keep these onions because they're so darn good.
But we're gonna improve it just a little bit by adding some buttered bread crumbs to the mix.
-Mm.
-So I have three slices of white sandwich bread that I've torn into quarters.
I'm just gonna put this into the food processor.
I'm gonna add 2 tablespoons of softened butter, 1/4 teaspoon of table salt, 1/4 teaspoon of pepper.
We're gonna pulse this ten times.
And we're gonna break those down into coarse crumbs.
So those are nicely processed.
-Mm.
Nice and fluffy.
-And we're gonna go over to this bowl.
So we're gonna put our onions in here.
And these are 3 cups of onions that are coming out of a 6-ounce container.
-Mm-hmm.
-And if you see any big pieces of onions, I kind of like -- -You eat them.
[ Both laugh ] -I just like to break them up because they have a tendency to burn on the top.
Or you could eat them.
Either way.
-Yeah.
-Okay, we have our green beans, we have our sauce, and we have our topping.
Now it's time to put everything together, so... -All right.
-...start with the green beans.
If you could hand those to me.
-Here you go.
-Thank you very much.
-Ah, you're using the paper towel as a sling.
-Sling.
-Oh.
Into the sauce.
-Right into the sauce.
-I like it.
-I just want to stir this together.
-That looks delicious.
-So now we can transfer this over to our baking dish.
Now, I have a 9"x13" baking dish.
Okay.
The green beans are nicely coated with our sauce.
-It smells so good.
-So good.
So at this point, you could stop and you can make this casserole ahead.
You can have the green beans and the sauce together, and you would want to refrigerate the topping separately.
And then you can put the two together whenever you want to -- the next day or two days down the road.
-I love it.
-It's a great make-ahead.
Now our topping.
You don't want to press this down.
You want to keep it kind of nice and loose.
So we're gonna put this in a 425-degree oven, middle rack for 15 minutes.
The topping will get brown.
It will bubble around the edges.
It'll be delicious.
-[ Gasps ] -Doesn't that look great?
-Look at the browning on that.
Oh.
-Smells wonderful.
-Yeah.
And you can see a little bubbling around the edges and the corners.
-Yeah.
We're gonna let this hang out for five minutes before we try it.
It's a little too hot right now.
-[ Laughs ] Okay.
-Five minutes is up.
It's time to eat our green bean casserole.
-I've been waiting.
I'm eager to see what's under those crumbs.
Oh!
It's not swimming in it, but there's plenty of sauce.
Mmm!
That sauce tastes like mushrooms.
-It's really velvety, the sauce is.
-Mmm.
-I mean, and it coats the green beans.
It's not too heavy.
It's a perfect balance.
-And the green beans are completely tender, but they're still nice and bright green, and they taste fresh.
And that topping.
The buttery bread crumbs with the canned onions -- brilliant.
Keith, this is delicious.
Thank you.
-You're welcome.
-So if you want to make a green bean casserole from scratch, make a sauce using fresh mushrooms and heavy cream, boil the green beans in salty water, then arrest their cooking with ice water, and top the casserole with a combination of buttery fresh bread crumbs and canned fried onions.
From "America's Test Kitchen," the ultimate green bean casserole.
This is really impressive.
-I'm ready for seconds.
-[ Laughs ] ♪♪ I've always thought of Thanksgiving like the big game.
And if you're the head coach, you need to have the right gear, which makes Adam the equipment manager.
-Equipment manager reporting for duty.
-All right, so I'm making the big meal.
The first thing I'm cooking is the turkey.
What do I need?
Obviously a roasting pan.
-Ditch the disposable foil roasting pan... -Yes.
-...and go for a good, solid roasting pan.
-Mm-hmm.
-We like to have nice, strong upright handles because if you put on those oven mitts... -Oh.
-...if you have good, strong handles, you can get a good, secure grip.
-Yeah.
-And when you have a heavy turkey in there, that's what you want.
We also like to have a roasting rack.
-Mm-hmm.
-They come with the roasting pan.
But we want it to fit snugly so it doesn't slide around.
-Yes!
-It's a bad moment when you tip the pan by accident and the turkey slides towards you coming out of the oven.
-And all the juices make a wave.
Yep.
-Exactly.
-Been there.
-This is our favorite roasting pan -- the Cuisinart Multiclad Pro 16-inch roasting pan with the rack.
It's $130.
-Not bad.
All right, so you mentioned gravy 'cause what's turkey without gravy?
-I want quarts of gravy.
It's a beverage as far as I'm concerned.
-But you need a good fat separator in order to separate those juices.
-That, you do.
You want a fat separator like this.
-Mm-hmm.
-You can see at the top there's a strainer.
So you just pour everything... -Ah.
-...from the roasting pan into the strainer.
That catches the solids, lets the juices and the fat go down into the cup.
-Right.
-Then you wait a couple of minutes.
The fat will rise to the top of those juices, but you have to decant it somehow.
You got to get it out of there.
-Yeah, I'm used to seeing that little spout, you know?
-Exactly.
We like this better.
This has a trigger-operated drain on the bottom.
-That's cool.
-So you just press it in, it drains, and then you stop the flow.
You don't get any fat in there.
That is the OXO Good Grips Good Gravy 4-cup fat separator.
It's 30 bucks and it's worth every penny.
-Moving on to stuffing, which is my personal favorite part of the meal.
-I am with you.
A lot of 13"x9" gratin dishes... -Mm-hmm.
-...or casserole dishes, you can't use under a broiler.
-Yes!
-Like glass or metal.
So you need a porcelain or ceramic baking dish for that.
-Mm-hmm.
-A couple of things.
You're picking it up there.
You want nice, generous handles 'cause that's gonna be screaming hot out of the oven.
-Right.
-The other thing we found is, you want about a 14-cup capacity.
We've tested them that have 12 cups and sometimes the stuff can spill over the side.
This is our favorite.
This is the Mrs. Anderson's baking lasagna pan with handle.
It's 37 bucks and it's broiler-safe.
It's the perfect thing.
-This is great advice, Adam.
Thank you.
-Happy Thanksgiving, Julia.
-For everything you need to know about the big meal and more, check out our website.
♪♪ -Most items on the Thanksgiving menu come with a little wiggle room, so you can be sure to get everything on the table all at once.
That is, except for mashed potatoes.
Those spuds have to be boiled and then mashed right at the last second, causing so much stress.
Or do they really have to be made at the last minute?
Elle's here.
She's gonna show us a great recipe that gives us some T. Day relief.
What say you?
-Well, anyone who's cooked with me knows that I live for a make-ahead moment.
-Okay.
-Except with mashed potatoes, they can get a little tricky, right?
-Right.
-Sometimes they lose their umph.
But today we found a way to make mashed potatoes that can stand the test of time -- or at least one day in the fridge.
-That's all we need.
Yeah.
-Yeah, yeah.
And it starts with russet potatoes.
-Okay.
-Right?
Russets have that traditional mashed potato flavor that we really want, but when you try to reheat them, they're grainy.
We're gonna do away with all of that.
And we're going to bake these potatoes instead of boil them.
-Nice.
-But not before we jump-start the cooking process by putting them in the microwave.
-All right.
-So we're gonna do some traditional things, like poke holes in the potatoes.
This is 5 pounds of russet potatoes.
They are going to go in the microwave for 16 minutes.
But at about eight minutes, at the halfway mark, I'm gonna just kind of go in and turn them over.
-Okay.
-Give them a little rotation.
-Great.
-Wow, those smell good already.
-Yeah, it smells like baked potatoes.
-Yeah.
So they're ready to go straight into the oven.
-All right.
All right.
-Take that.
I'll close the door and open this door.
-Wonderful.
These potatoes will go into the oven that's set at 450 degrees... -Okay.
-...at the middle rack position, and you can just lay them on there.
All of them go on one rack.
-Awesome.
-For 30 minutes.
-That's it?
-Yeah.
That's it.
We'll come about 15 minutes and we'll rotate these, also.
-All right, sounds good.
-All right.
All right, Bridget.
So we got our potatoes out of the oven.
-Yep.
-I'm going to start by just cutting these potatoes in half lengthwise.
-Oh, yeah.
Oh, steamy, steamy spuds.
-Steamy spuds.
They're pretty hot.
I'm gonna use a towel here.
And just scrape the insides of the potatoes into a bowl.
Here are the potatoes -- 5 pounds, ready to mash.
-Okay.
-But we're gonna do this mashing in two steps.
We're gonna first do it by hand using a potato masher.
You can use a fork.
You can use a spatula.
-Okay.
-All right.
So this is perfect.
We're now gonna put half of these potatoes into the stand mixer.
And this is just to make sure that there aren't any dry, clumpy bits of potato.
-Okay.
-So we're just gonna put it on high for about 30 seconds.
So I'm just gonna gradually add the rest.
All right, Bridget.
It's been a minute and a half.
This is the smooth texture... -Mm!
-...we're looking for.
So I'm gonna add to this 2 cups of hot heavy cream.
And I'm just gonna fold that in.
-Oh, my goodness.
-So now we can fold in 8 tablespoons of butter.
-Mmm.
-And it, too, is melted.
You can melt it right in the microwave.
-All right.
-And I'm just gonna fold that in.
And finally 2 teaspoons of table salt.
-Okay.
-All right.
These look really good.
Now, we have one more step to make it a make-ahead.
-Okay.
-And that's more heavy cream.
-What?
-Yeah.
So we're gonna add 1/2 cup at a time.
This is 1 cup.
-And that's heated, as well?
-It is heated, as well.
This is actually what keeps the potatoes from drying out in the fridge overnight.
And if you think that you've done it wrong, you did it right.
-Really?
-Yes.
-Okay.
So I'm gonna transfer this to a bowl to get ready to store.
And I'm gonna cover it with some plastic.
All right.
This is ready to go in the fridge.
And it can be stored for up to two days.
-Two days?
-Yes, girl.
-It's make-ahead make-ahead?
-Make-ahead make-ahead.
Let's go.
Okay, Bridget, we got some potatoes that have been in the fridge for a day, so to get them ready for the microwave, I'm just gonna poke some holes in it.
And then it's gonna go into the microwave for 14 minutes, stirring at seven minutes just to redistribute.
-Sounds great.
-All right, let's go.
-Let me get the door.
-Thank you.
Okay, Bridget, these mashed potatoes have been in the microwave for 14 minutes, so they look beautiful.
-They do look beautiful.
-I'm just gonna season them with a little salt and pepper.
-Right.
Look how creamy they are.
-All right, let me give it a taste.
It's still my favorite dish.
-You feel like sharing?
-Yes, I do.
I definitely feel like sharing.
-Oh, yeah.
These do not look like make-ahead.
No.
-They look like we made them 20 minutes ago.
-A second ago.
Super potato flavor.
I mean, big potato flavor.
-Big potato energy right here.
-It's not grainy at all.
-Mmm.
Mnh-mnh.
-But you still get good pockets of potato in there.
-Yeah, you do.
They're buttery.
-They are buttery.
-They're creamy.
Definitely worthy of Thanksgiving.
Make-ahead or not, that's some of the best mashed potatoes I've ever had.
-Thank you.
-They're gorgeous.
-Thank you very much.
-Thank you.
You want to thank her, too, because you definitely want to make these make-ahead mashed potatoes at home.
And it starts by baking russet potatoes in the microwave and then the oven, mash the potatoes with a potato masher and then the standing mixer, and finally front-load the mashed potatoes with lots of creamy dairy.
A few minutes in the microwave is all you need on Thanksgiving for perfect mashed potatoes.
So from "America's Test Kitchen," make-ahead mashed potatoes.
Unbelievable.
I mean, unbelievable.
Like, I'm not even sure they're real.
Can I have some more?
-[ Laughs ] ♪♪ -A fun and easy way to make Thanksgiving even more festive is by including some autumn-themed cocktails.
-Yeah, and why should food get all the fun?
Well, we're here to present two drinks for you, and to each other, that should dress up the Thanksgiving table.
-Yeah.
First up, I'm making a non-alcoholic cranberry spritzer called the New Englander.
And it starts by making a shrub syrup.
That's just a simple syrup.
2 cups of cranberries -- and they can be fresh or frozen -- with 1 cup of sugar and 6 ounces of water, which is 3/4 cup.
Now, I'm gonna slam this over high heat, bring it to a boil.
Then when it's boiling, I'm gonna turn the heat down, cover it, and let it simmer until the cranberries start to bust apart.
-I, too, am making a flavored syrup.
My cocktail is called the Fireside.
So it's kind of our take on Wisconsin State alcoholic beverage, which is the Old-fashioned.
-Aha!
-Yeah, brandy Old-Fashioned.
So I'm gonna flavor mine with spices.
I've got 5 ounces of water here, and I've got 3/4 cup of granulated sugar.
And I've got one cinnamon stick here.
Four cloves.
And I've got eight whole allspice berries here.
Just using a mortar and pestle to give them a light crush.
Just releasing the aromatics in.
Don't have to go too crazy here.
We're not looking for ground allspice.
I'm gonna wrestle these into my saucepan here.
-I'm at a boil here.
So I'm just gonna turn this down, put the lid on, and let it go for five minutes.
-All right.
All I need to do is heat this over medium heat.
And I'm gonna whisk it.
I don't want it to come to a boil, but I want all that sugar to dissolve.
All right.
-[ Sniffs ] Mmm.
-Sugar is all dissolved.
I'm gonna let this sit off heat and cool down.
It's gonna continue to extract some of the flavor from those spices.
So on that note, I want to introduce you to flavorful rim sugars.
We're making a pumpkin pie-spiced rim sugar and it starts with 1/4 cup of granulated sugar.
This is 2 teaspoons of ground cinnamon.
We have 1 teaspoon of ground ginger, 1/2 teaspoon of ground nutmeg, 1/2 teaspoon of ground allspice.
This is a place that like the spice syrup, you can really use your imagination.
You could use cardamom in here, would be gorgeous.
-Mmm.
That would be good.
-All right.
I'm just breaking up the lumps here.
And that is it.
-All right, I'm gonna slide your syrup aside because I have to mash these cranberries.
Oh, look at that.
You can see they've all busted open, which is perfect.
So I'm gonna get in here with a potato masher.
I'm gonna gently because this is a stainer.
This is what I call a shirt killer.
You get this on your shirt, it's over.
So we're just gonna mash up the berries again, releasing all their liquid... -Mmm.
-...and flavor.
So here I have a fine mesh strainer over a little bowl and it's lined with a triple layer of cheesecloth.
What we're gonna do is strain this cranberry mixture into the strainer.
All right.
We're gonna let this sit and drain for about 30 minutes, let all that free-run juice come right out.
This has been sitting for 30 minutes.
And you can see gravity has done all the work for us.
-Oh.
-So I am gonna try to squeeze every last bit out of this bundle.
-[ Gasps ] -I'm just gonna use tongs.
All right.
That's good.
Set that aside.
-Mm-hmm.
-Now, just to add a little zing to it, this is 1 ounce of white wine vinegar, which is about 2 tablespoons.
And that is it.
Now, this is amazing, as I said, at Thanksgiving.
And having it on hand in a squeeze bottle makes it even easier just to add at any old time.
-Absolutely.
-And that's it.
Time to make the cocktail.
-That's it.
All right.
-Or mocktails, I should say.
All right.
So I'm just gonna fill these nice, tall Collins glasses with about halfway with ice.
Now I'm gonna measure out the shrub syrup.
I'm looking for 2 ounces.
And I'm just using this very clever liquid measuring cup which has the measurements on the side.
So now I'm gonna add 1/4 ounce lime juice to each of the glasses.
Now I'm gonna add some seltzer.
-Nice.
-Just plain seltzer.
You want about 6 ounces.
Now, I love this graduated look.
The ombré look.
If you have a nice, long cocktail spoon, you can really go down into the bottom of the glass and pull those flavors up.
-Mmm.
-To finish it off, a little curl of lime zest.
There you are, my darling.
-[ Gasps ] Lovely.
-Oh, that looks good.
-Cheers.
-Cheers.
-Ooh, that's delightful.
-Ah!
That's so good.
-So refreshing.
-Mmm.
-So we've got that sorted.
This is our take on the Brandy Old-Fashioned.
Now, I went ahead and strained our spiced syrup.
I am going to pour this in here.
And this can stay in the refrigerator for a couple of weeks.
I've got the rim sugar to sugar the rims of the glasses.
I've got an orange.
I'm just gonna run it just around the edge of this glass.
I'm just going to put this into the rim sugar.
Just quickly.
Knock off any excess, and there we go.
All right.
So we're making two.
So I'm gonna give amounts for two cocktails here.
And we're starting off our Brandy Fireside, as we call it.
It's 2 ounces per cocktail.
If you have a jigger, you can absolutely use that.
-Mm-hmm.
-Makes sense.
All right.
So that's two.
Next up, bitters.
We're using orange bitters here.
-Mm-hmm.
-So I'm using 1/8 teaspoon per cocktail.
So that's 1/4 teaspoon.
And we need a teaspoon per cocktail of our spiced syrup.
So I'm going to fill this up about 3/4 way with ice.
We want this to get nice and cold.
So I'm gonna use the bar mixing spoon.
-Mm-hmm.
-Just really want to go around the outside.
While I'm doing this, I have some more ice in the freezer.
Some special ice just for you.
-Ooh, special ice.
-I love these giant cubes.
They just make everything look so special.
The orbs are nice, too.
-Festive.
-Very festive.
-Mm-hmm.
-So just pop them right out.
Get my little tongs here.
So now it's time to strain.
I like going back and forth.
-Oh!
-All right, so this is just beautiful.
A little garnish here.
-Oh.
-I like to nestle it right on the side there.
Isn't that so pretty?
-Oh, I like it, how you cut the apple like that.
-Yes.
These were cut right across the equator of the apple.
-Mm-hmm.
But that, my friend, is beautiful.
Cheers.
-Cheers.
-[ Sniffs ] Wow.
That smells good.
Oh!
This is smooth.
-Yes.
-And the spices on the rim... -Mmm.
-...they don't all rub off.
I just got a little bit.
-It'll last the entire cocktail.
-Mmm!
-I mean, just picture this.
You're cold.
Your guests come in.
You shove one of these into their hands.
-[ Laughs ] -It's gonna be a good thing.
-It would make me feel welcome.
-Yeah, definitely.
You can get this recipe and all the recipes from this season, along with product reviews and select episodes.
They're all on our website.
That's americastestkitchen.com/tv.
-Nicely done.
-Thank you.
And happy Thanksgiving to you.
-Mmm.
-Really happy Thanksgiving to me.
-That's delicious.
-"America's Test Kitchen" is brought to you by the following... -Plugrà European-style butter was created for all chefs, cooks, and bakers.
Slow-churned with 82% butterfat for a smooth texture and more pliability for flaky crusts.
Plugrà -- from professional kitchens to your home.
-On an American Cruise Lines journey along the legendary Mississippi River, travelers explore Civil War battlefields and historic riverside towns.
Aboard our fleet of American riverboats, you can experience the local culture and cuisine and discover the music and history of the Mighty Mississippi.
American Cruise Lines, proud sponsor of "America's Test Kitchen."
-The Breville+ app has over 1,300 guided recipes from culinary professionals, cook guides that help you turn what's in your fridge into quick meals, plus live and on-demand classes, all tested and tuned for your Breville appliance.
♪♪ -Visit our website to sign up for our free e-mail newsletter with more revolutionary recipes and the stories behind 25 years of "Test Kitchen" discoveries -- americastestkitchen.com/tv25.
From the cooks and editors of "America's Test Kitchen," Cook's Illustrated magazine has been all about the why and how of cooking for over 30 years.
Get a year of award-winning reporting, science-based discoveries, trusted reviews, and more.
The cost is $19.95.
That's 63% less than the cover price.
To subscribe, visit cooksillustrated.com/ tvsubscribe.
♪♪ ♪♪ ♪♪ ♪♪ ♪♪ ♪♪ ♪♪


America's Test Kitchen is presented by your local public television station.
Distributed nationally by American Public Television